1.3. Xpath finder
How to turn on Xpath finder?
The Xpath finder could be either a standalone tool to help find a custom xpath or it could be used along with RITE.
- If you click the Xpath finder option in the extension popup dialog, it goes the standalone mode.
- To use it with RITE, you could open the settings dialog on RITE main console, and check the option “Use Xpath”. Now when you enter the recording mode, you’ll see the Xpath Finder shown in page.
A few quick tips to use it
- Press the “Shift” key to pause/resume the content changing while moving cursor. Once you’ve paused it, you could continue customizing your xpath by checking the options.
- Every time you click on an checkbox in Xpath finder, it will recalculate the xpath based on the change.
- If the Shift key doesn’t pause/resume the xpath changing, it could be the tab is not focused.
How does it work?
When you move cursor around dom elements, you’ll see the content changes correspondingly in Xpath Finder. In the top text box, it shows the xpath that is generated using the default algorithm. You can also customize the way that Xpath is generated in the following ways.
Based on attributes:
For example, the text in this case might not be changed anytime soon, so you could check that option, and it’ll automatically show the updated xpath based on the text attribute.
Based on location:
Sometimes, none of the attributes are reliable, and you might just want to make the xpath based on the element’s location in the dom tree. In this case, you could check all of the options off.
Partial match:
For example, you might just need the text attribute partially matched in some cases. Then you could check the contains checkbox next to the text input box.
After you’ve customized your new xpath, you might want to click the “ping” button to check if it’s still matching the correct element. In the end, you could save it, so that RITE will use the new xpath instead of the default xpath when needed. When use the tool in the standalone mode, once your page navigates out, the Xpath finder will be gone, and you could reopen it if needed.
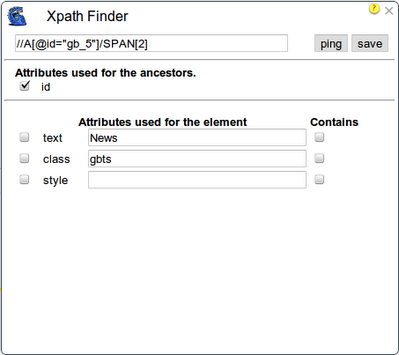
A real example
Let’s say we’d like to get the xpath of the Maps link on Google home page.
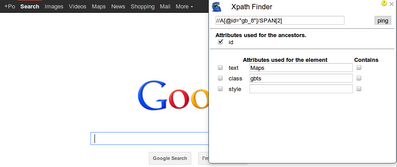
When we move the cursor on top of the Maps link, we would see something like the above image, and by default, we get the xpath: //A[@id=”gb_8”]/SPAN[2]
If we think the id in the xpath might be changed a lot more frequently than the text “Maps”, then we could press the “Shift” key to pause the content changing, and then check the text checkbox before “Maps” in Xpath finder. Now, we get another xpath generated: //SPAN[text()=”Maps”]
In some circumstances, there might not be any attributes that are reliable enough, we might just want to generate the xpath based on its location. In this case, we could simply check all of the checkboxes in Xpath finder off. Then we’ll get another xpath: //DIV[1]/OL[1]/LI[5]/A[1]/SPAN[2]
Of course we would like to double check that after customizing the xpath, does it still match the correct element? That’s what the ping button next to the Xpath input box does. Clicking the button will highlight the corresponding element in page with a blue boarder, and it will disappear within a sec.
Limitation
It doesn’t support iframe right now.
When use it with RITE, for the custom xpath that is saved, it will be gone if you navigate out of the current page.
Comments
You do not have permission to add comments.